 Save
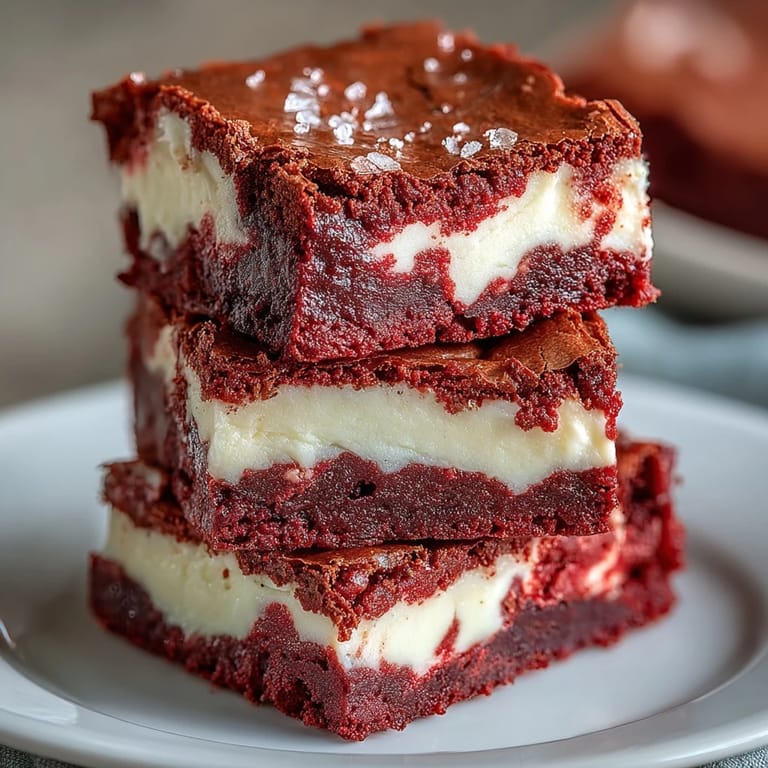
Save My neighbor knocked on my door one February afternoon with a baking emergency: she needed something red, chocolatey, and impressive for a Valentine's party in four hours. I pulled out cream cheese and cocoa powder, remembering a swirled brownie idea I'd been meaning to try. What came out of the oven that day became the dessert everyone asked about, the kind that makes people lean in and ask if you're secretly a pastry chef. You're not, of course, but these brownies don't need to know that.
I made these for a book club meeting once, and the usual polite nibbling turned into a quiet kind of reverence. Someone cut a second piece before we even started discussing the novel. Another person took a photo of the swirl pattern and texted it to her sister mid-meeting. By the time we remembered why we'd gathered, half the pan was gone and I had three requests for the recipe. That's when I knew this wasn't just another brownie.
Ingredients
- Unsalted butter: Melted and slightly cooled, it creates that dense fudgy texture without making the batter greasy, and unsalted lets you control the sweetness perfectly.
- Granulated sugar: Regular white sugar works best here because it dissolves smoothly and doesn't compete with the cocoa or cream cheese tang.
- Eggs: Room temperature eggs blend faster and create a smoother batter, so set them out while you gather everything else.
- Vanilla extract: Pure vanilla adds warmth that balances the cocoa, though imitation works in a pinch if that's what you have.
- Red food coloring: Gel gives more vibrant color with less liquid, but standard liquid works fine, just don't skimp or you'll get pink instead of red.
- All-purpose flour: Measure by spooning it into the cup and leveling off, packing it down makes the brownies cakey instead of fudgy.
- Unsweetened cocoa powder: Dutch-process gives a smoother chocolate flavor, but natural cocoa works too and adds a slight tang.
- Cream cheese: Must be softened to room temperature or you'll get lumps no amount of beating will fix, trust me on this one.
- Salt: Just a pinch deepens all the flavors and keeps the sweetness from becoming one-note.
Tired of Takeout? 🥡
Get 10 meals you can make faster than delivery arrives. Seriously.
One email. No spam. Unsubscribe anytime.
Instructions
- Prep your pan:
- Line the pan with parchment so it hangs over two sides like little handles. This trick means you'll lift the whole brownie slab out cleanly instead of digging out corner pieces with a spatula.
- Mix the red velvet base:
- Whisk the melted butter and sugar until it looks like wet sand, then add eggs, vanilla, and food coloring until the batter turns that signature deep red. Sift in the dry ingredients and fold gently, stopping the moment you don't see flour streaks.
- Reserve batter for swirling:
- Scoop out a quarter cup and set it aside in a small bowl. Spread the rest evenly in your pan, using the back of a spoon to smooth it into the corners.
- Make the cheesecake layer:
- Beat the cream cheese first until it's completely smooth and fluffy, then add sugar, egg, and vanilla. Mix until it looks like thick whipped cream with no lumps hiding at the bottom of the bowl.
- Layer and swirl:
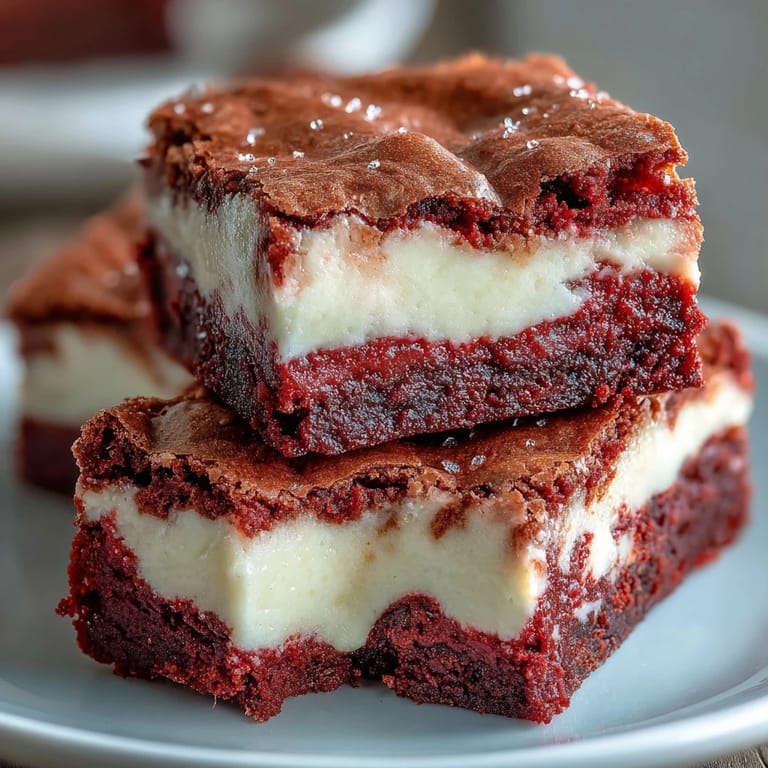
- Pour the cheesecake mixture over the red velvet base and spread it gently to the edges. Dollop the reserved red batter on top in random spoonfuls, then drag a knife through in loops and figure-eights until you see marbled swirls.
- Bake until just set:
- Slide it into the oven for 35 minutes, watching for the center to look barely firm with a slight jiggle. A toothpick should come out with a few moist crumbs clinging, not wet batter, not bone dry.
- Cool completely:
- Let the pan cool on a rack, then refrigerate for at least two hours. Cold brownies slice cleanly with a sharp knife wiped between cuts, giving you those perfect squares.
 Save
Save These brownies showed up at a baby shower I attended last spring, and I watched a very pregnant friend close her eyes after the first bite like she'd found exactly what she'd been craving. She ate two pieces, declared them perfect, then asked if I'd make them for her birthday in July. Some desserts just earn that kind of loyalty without trying too hard.
Storing and Make-Ahead Magic
I've kept these in the fridge for nearly a week in an airtight container, and they stayed fudgy and delicious the whole time. They also freeze brilliantly: wrap individual squares in plastic wrap, then pile them in a freezer bag for up to three months. Thaw in the fridge overnight or let them sit at room temperature for about thirty minutes, and they taste like you just baked them.
Customizing Your Swirls
Once you nail the basic swirl, you can get creative with the pattern. Try dragging the knife in straight lines one direction, then perpendicular for a geometric look, or make tight spirals from the center outward. I've also sprinkled mini chocolate chips over the cheesecake layer before swirling, which adds little pockets of melty chocolate throughout. Some people add a handful of white chocolate chips to the red velvet batter for extra richness, and it works beautifully if you're feeling indulgent.
Serving Suggestions
These brownies are rich enough to stand alone, but I've served them with a dollop of whipped cream and fresh raspberries for dinner parties. The tartness of the berries cuts through the sweetness in a way that feels almost elegant. For casual gatherings, a scoop of vanilla ice cream on the side never disappoints, especially if the brownie is still slightly warm from a quick microwave reheat.
- Dust with powdered sugar just before serving for a simple but pretty finish.
- Pair with strong coffee or cold milk to balance the richness.
- Cut into smaller squares for parties so people can try them without committing to a huge portion.
 Save
Save Every time I pull these out of the fridge, I'm reminded that some recipes earn their keep not through complexity, but through reliability and joy. Make them once, and you'll understand why they've become my go-to for any occasion that calls for something special.
Recipe FAQs
- → Can I use natural food coloring instead of artificial?
Yes, you can substitute with natural red food coloring, though the color may be less vibrant. Beet powder is a popular natural alternative.
- → How do I know when the brownies are done?
The center should be just set and a toothpick inserted should come out with a few moist crumbs, not wet batter. Avoid overbaking to maintain fudgy texture.
- → Can I make these ahead of time?
Absolutely. These brownies actually improve after refrigeration. Make them up to 2 days ahead and store covered in the refrigerator.
- → Why is my cheesecake layer lumpy?
Ensure your cream cheese is fully softened to room temperature before mixing. Beat it thoroughly before adding other ingredients for a smooth consistency.
- → Can I freeze these brownies?
Yes, wrap individual squares tightly in plastic wrap, then place in a freezer bag. They'll keep for up to 3 months. Thaw in the refrigerator before serving.
- → What size pan should I use for thicker brownies?
Use a smaller 7x7-inch pan for thicker brownies, but increase baking time by 5-10 minutes and monitor for doneness.