Save
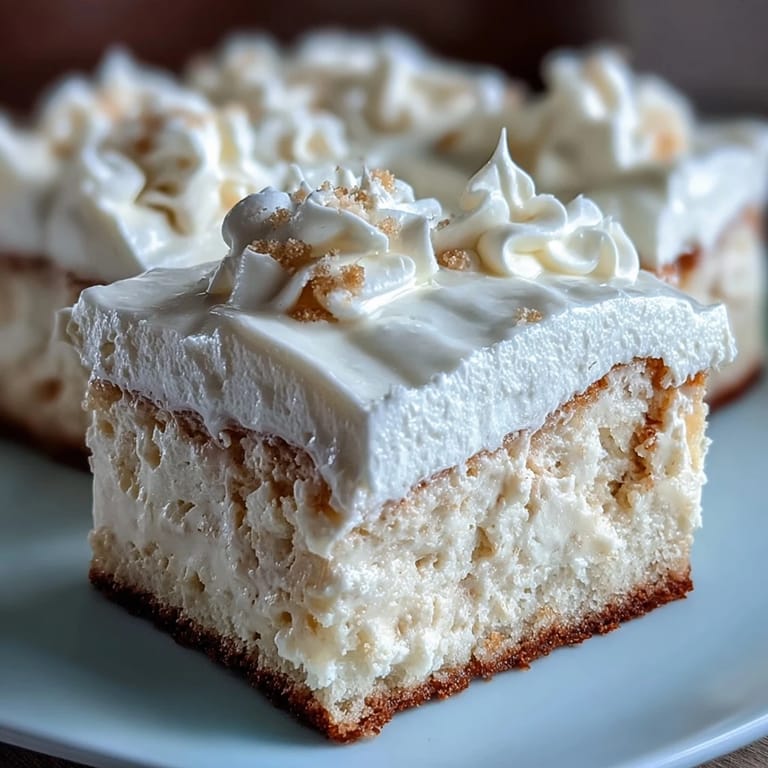
Save My neighbor's daughter was graduating, and I volunteered to bring a cake without fully thinking through the chaos of baking for 24 people. Standing in her kitchen at 6 AM with my mixer whirring and flour somehow on every surface, I realized this vanilla sheet cake would be the one—simple enough not to stress me out, but impressive enough to feel celebratory. There's something about vanilla that works for these big moments; it doesn't compete, it just shows up. By the time that cake came out of the oven, golden and perfectly level, I knew I'd found my go-to for any gathering worth marking.
I'll never forget seeing that cake surrounded by friends at the party, kids pointing at the sprinkles, parents sneaking second slices when they thought no one was looking. One mom asked for the recipe right there, frosting on her finger, and I realized how a simple vanilla cake can become a memory marker—something people will actually remember making or eating years later.
Ingredients
- All-purpose flour (3 cups): The foundation of everything—I learned early on that sifting it makes a noticeable difference in how tender the crumb turns out, though it's not strictly required if you're in a hurry.
- Baking powder and baking soda (2½ tsp and ½ tsp): This combination gives you that tender, cloud-like texture that makes sheet cakes special; don't skip or reduce either one.
- Salt (½ tsp): Sounds small, but it actually brightens the vanilla flavor and makes the cake taste less flat and one-dimensional.
- Unsalted butter (1 cup for cake, 1 cup for frosting): Room temperature is non-negotiable here—cold butter won't cream properly and you'll end up with a dense cake instead of fluffy layers.
- Granulated sugar (2 cups): This creams with the butter to trap tiny air pockets, which is what gives the cake its rise and tender crumb.
- Large eggs (4): Also room temperature, because they blend seamlessly into the batter this way and help create that structure you're after.
- Vanilla extract (1 tbsp for cake, 2 tsp for frosting): Use real vanilla if you can—the flavor difference in something this simple is honestly noticeable, and it's worth the couple extra dollars.
- Whole milk (1½ cups for cake, ¼ cup for frosting): Room temperature milk incorporates smoothly without shocking the batter and keeps things tender.
- Powdered sugar (4 cups): Sift it before using so you don't end up with lumps in your buttercream that no amount of beating will fix.
- Graduation decorations and optional food coloring: This is where you make it personal—school colors, favorite numbers, whatever makes sense for the person being celebrated.
Tired of Takeout? 🥡
Get 10 meals you can make faster than delivery arrives. Seriously.
One email. No spam. Unsubscribe anytime.
Instructions
- Get your oven ready and pan prepared:
- Preheat to 350°F and grease a 12x18-inch sheet pan, then line it with parchment paper—this is the move that makes cleanup actually bearable and keeps the edges from sticking. The parchment should come up slightly on the sides so you can lift the cooled cake out cleanly.
- Combine your dry ingredients:
- Whisk flour, baking powder, baking soda, and salt in a medium bowl and set it aside so you're not scrambling when you're mixing wet ingredients. This keeps you from overmixing later, which is the enemy of tender cakes.
- Cream butter and sugar until fluffy:
- Beat them together for about 3 minutes until the mixture is pale and noticeably lighter in color and texture. This is where the magic starts—you're building the structure that will make your cake rise.
- Add eggs one at a time with patience:
- After each egg, beat well so it fully incorporates before adding the next one; this prevents the batter from looking curdled and broken. Then mix in your vanilla extract until everything looks smooth and combined.
- Alternate dry and wet ingredients gently:
- Start with half the dry mix on low speed, then pour in half the milk, then finish with the rest of each, mixing just until combined each time. Overmixing at this stage develops gluten, which makes the cake tough, so resist the urge to beat it to death.
- Spread and bake:
- Spread the batter evenly:
- Pour into your prepared pan and use a spatula to level it out so it bakes evenly without doming in the middle. Bake for 28-32 minutes until a toothpick inserted in the center comes out clean—don't bake longer or the edges will start drying out.
- Cool completely before frosting:
- Let it sit in the pan on a wire rack until it's completely cool to the touch, which takes about an hour. This prevents the frosting from melting into soft spots.
- Make the buttercream:
- Beat softened butter for 2 minutes until it's creamy, then gradually add your sifted powdered sugar while mixing on low to avoid a white flour cloud. Add vanilla, milk, and salt, then beat on high for 2-3 minutes until it's light and fluffy, adding optional food coloring if you're going for school colors.
- Frost and decorate:
- Spread the buttercream evenly over the cooled cake using an offset spatula or regular knife, then top with graduation-themed sprinkles or edible decorations. If you want to pipe names or borders, transfer some frosting to a piping bag before you spread the rest.
 Save
Save There was a moment during that graduation party when the graduate, who was anxious about everything that week, took a bite and actually smiled—not a polite smile, but a real one. Somehow a simple vanilla cake became part of her good memory from that day, which is exactly what food should do.
Why Vanilla Wins for Celebrations
Vanilla might seem boring until you realize it's the flavor everyone actually wants at big events. It doesn't polarize, it doesn't demand attention, and it pairs with literally any frosting color or decoration without fighting for the spotlight. Over the years, I've learned that the most celebrated cakes are often the ones that let the moment shine, not the ones with the trendiest flavors or most complicated technique.
Storage and Make-Ahead Magic
The beauty of sheet cakes is that they actually improve on day two when the crumb has time to settle and the frosting sets properly. I've successfully baked the cake layers a full day ahead, wrapped them in plastic wrap, and frosted them the morning of an event without any stress. Leftovers last up to 4 days in the refrigeridge if they're covered, though honestly they rarely last that long in a house with people who know they exist.
Customizing for Your Celebration
The blank canvas of a sheet cake is its superpower—you can match school colors with gel food coloring, add almond extract if you want subtle depth, or even swap in lemon zest for a different flavor direction. I've done piped borders with a steady hand and simple sprinkles with a shaky one, and both looked just as festive on a table full of celebrating people.
- Add ½ tsp almond extract to the batter for a hint of subtle flavor complexity without changing the whole vibe.
- If you want extra height and visual drama, you can bake this batter in two 9-inch round pans instead and layer them with frosting in between.
- Make the cake the day before and frost it the morning of so you're not stressed on party day.
 Save
Save This cake has become my default move for marking important moments, and I hope it becomes yours too. There's real power in something simple, reliable, and made with intention for the people you care about.
Recipe FAQs
- → What ingredients give this cake its vanilla flavor?
The cake gets its vanilla flavor from pure vanilla extract added to both the batter and the buttercream frosting.
- → Can I prepare this cake ahead of time?
Yes, you can bake the cake ahead and store it covered at room temperature for one day or refrigerate for up to four days before decorating.
- → How do I ensure a moist, fluffy cake texture?
Beating the butter and sugar until light and fluffy, and alternating dry ingredients with milk when mixing helps create a moist, tender crumb.
- → What tools are needed for baking and decorating this cake?
You will need a 12x18-inch sheet pan, an electric mixer, mixing bowls, a whisk, spatula, parchment paper, and a wire rack for cooling.
- → Can I substitute ingredients for dietary restrictions?
Yes, substituting all-purpose flour with a 1:1 gluten-free blend works well, and almond extract can be added for extra flavor if desired.